[Published in Open Source For You (OSFY) magazine, May 2015 edition.]
In this article we shall explore network programming in Haskell.
Let us begin with a simple TCP (Transmission Control Protocol) client and server example. The network package provides a high-level interface for communication. You can install the same in Fedora, for example, using the following command:
After importing the required libraries, the main function connects to a localhost server running on port 3001, sends a string “Hello, world!”, and closes the connection.
The connectTo function defined in the Network module accepts a hostname, port number and returns a handle that can be used to transfer or receive data.
The type signatures of the withSocketsdo and connectTo functions are as under:
ghci>:t withSocketsDo
withSocketsDo ::IO a ->IO a
ghci>:t connectTo
connectTo ::HostName->PortID->IOGHC.IO.Handle.Types.Handle
The main function starts a server on port 3001 and transfers the socket handler to a handleConnections function. It accepts any connection requests, reads the data, prints it to the server log, and waits for more clients.
Firstly, you need to compile the tcp-server.hs and tcp-client.hs files using GHC:
$ ghc --make tcp-server.hs
[1 of 1] Compiling Main             ( tcp-server.hs, tcp-server.o )
Linking tcp-server ...

$ ghc --make tcp-client.hs
[1 of 1] Compiling Main             ( tcp-client.hs, tcp-client.o )
Linking tcp-client ...
You can now start the TCP server in a terminal:
$ ./tcp-server
Starting server ...
You can then run the TCP client in another terminal:
$ ./tcp-client
You will now observe the “Hello, world” message printed in the terminal where the server is running:
$ ./tcp-server
Starting server ...
Hello, world!
The Network.Socket package exposes more low-level socket functionality for Haskell and can be used if you need finer access and control. For example, consider the following UDP (User Datagram Protocol) client code:
-- udp-client.hsimportNetwork.Socketmain ::IO ()
main = withSocketsDo $do
(server:_) <- getAddrInfo Nothing (Just"localhost") (Just"3000")
s <- socket (addrFamily server) Datagram defaultProtocol
connect s (addrAddress server)
send s "Hello, world!"
sClose s
The getAddrInfo function resolves a host or service name to a network address. A UDP client connection is then requested for the server address, a message is sent, and the connection is closed. The type signatures of getAddrInfo, addrFamily, and addrAddress are given below:
-- udp-server.hsimportNetwork.Socketmain ::IO ()
main = withSocketsDo $do
(server:_) <- getAddrInfo Nothing (Just"localhost") (Just"3000")
s <- socket (addrFamily server) Datagram defaultProtocol
bindSocket s (addrAddress server) >>return s
putStrLn"Server started ..."
handleConnections s
handleConnections ::Socket->IO ()
handleConnections conn =do
(text, _, _) <- recvFrom conn 1024putStrLn text
handleConnections conn
The UDP server binds to localhost and starts to listen on port 3000. When a client connects, it reads a maximum of 1024 bytes of data, prints it to stdout, and waits to accept more connections. You can compile the udp-server.hs and udp-client.hs files using the following commands:
$ ghc --make udp-server.hs
[1 of 1] Compiling Main             ( udp-server.hs, udp-server.o )
Linking udp-server ...

$ ghc --make udp-client.hs
[1 of 1] Compiling Main             ( udp-client.hs, udp-client.o )
Linking udp-client ...
You can start the UDP server in one terminal:
$ ./udp-server
Server started ...
You can then run the UDP client in another terminal:
$ ./tcp-client
You will now see the “Hello, world!” message printed in the terminal where the server is running:
$ ./udp-server
Server started ...
Hello, world!
The network-uri module has many useful URI (Uniform Resource Identifier) parsing and test functions. You can install the same on Fedora using the following command:
$ cabal install network-uri
The parseURI function takes a string and attempts to convert it into a URI. It returns ‘Nothing’ if the input is not a valid URI, and returns the URI, otherwise. For example:
You can make a GET request for a URL and retrieve its contents. For example:
importNetworkimportSystem.IO
main = withSocketsDo $do
h <- connectTo "www.shakthimaan.com" (PortNumber80)
hSetBuffering h LineBuffering
hPutStr h "GET / HTTP/1.1\nhost: www.shakthimaan.com\n\n"
contents <- hGetContents h
putStrLn contents
hClose h
You can now compile and execute the above code, and it returns the index.html contents as shown below:
The whois Haskell package allows you to query for information about hosting servers and domain names. You can install the package on Ubuntu, for example, using:
$ cabal install whois
The serverFor function returns a whois server that can be queried for obtaining more information regarding an IP or domain name. For example:
You can use the above specific information with the whois1 function to make a DNS (Domain Name System) query:
ghci> whois1 "shakthimaan.com"WhoisServer {hostname ="com.whois-servers.net", port =43, query ="domain "}
Just"\nWhois Server Version 2.0\n\nDomain names in the .com and .net domains can now be registered\n...
You can also use the whois function to return information on the server as shown below:
ghci> whois "shakthimaan.com"Just"\nWhois Server Version 2.0\n\nDomain names in the .com and .net domains can now be registered\n...
The type signatures of serverFor, whois1 and whois functions are as follows:
The dns package provides a number of useful functions to make Domain Name System queries, and handle the responses. You can install the same on Ubuntu, for example, using the following commands:
$ sudo apt-get install zlib1g-dev
$ cabal install dns
A simple example of finding the IP addresses for the haskell.org domain is shown below:
The defaultResolvConf is of type ResolvConf and consists of the following default values:
-- * 'resolvInfo' is 'RCFilePath' \"\/etc\/resolv.conf\".---- * 'resolvTimeout' is 3,000,000 micro seconds.---- * 'resolvRetry' is 3.
The makeResolvSeed, and withResolver functions assist in making the actual DNS resolution. The lookupA function obtains all the A records for the DNS entry. Their type signatures are shown below:
ghci>:t makeResolvSeed
makeResolvSeed ::ResolvConf->IOResolvSeed
ghci>:t withResolver
withResolver ::ResolvSeed-> (Resolver->IO a) ->IO a
ghci>:t lookupA
lookupA
::Resolver-> dns-1.4.5:Network.DNS.Internal.Domain->IO
(Either
dns-1.4.5:Network.DNS.Internal.DNSError
[iproute-1.4.0:Data.IP.Addr.IPv4])
The lookupAAAA function returns all the IPv6 ‘AAAA’ records for the domain. For example:
[Published in Open Source For You (OSFY) magazine, April 2015 edition.]
In this article we shall explore access to Redis and PostgreSQL databases using Haskell modules. The hackage website at https://hackage.haskell.org/packages/#cat:Database provides a vast number of database packages that you can use, a couple of which will be covered here..
You will need to install the cabal-install tool on Fedora, for example, using the following command:
$ sudo yum install cabal-install
Connecting to the Redis database
Let’s use the hedis package to connect to the Redis server. Install the Fedora dependency package alex, and the Redis server as shown below:
$ sudo yum install alex redis
You can then install the hedis package using the following commands:
$ cabal update
$ cabal install hedis
This installs the latest hedis version 0.6.5. You can now start the Redis server on Fedora using the service command:
$ sudo service redis start
You can then test connectivity to the Redis server using the redis-cli command by issuing the PING command as follows:
$ redis-cli

127.0.0.1:6379> PING
PONG
You can also test the same using the hedis package inside the GHCi interpreter as illustrated below:
The different options that can be used in defaultConnectInfo are as follows:
connectHost ="localhost"
connectPort =PortNumber6379-- Redis port
connectAuth =Nothing-- No authentication
connectDatabase =0-- SELECT database 0
connectMaxConnections =10-- Up to 10 connections
connectMaxIdleTime =20-- Keep connection open for 20 seconds
The types of conn, connect, runRedis and ping are given below:
ghci>:t conn
conn ::Connection
ghci>:t connect
connect ::ConnectInfo->IOConnection
ghci>:t runRedis
runRedis ::Connection->Redis a ->IO a
ghci>:t ping
ping ::RedisCtx m f => m (f Status)
If the Redis server was not started, and you tried to issue the ping command, the following exception will be automatically thrown by the package:
ghci> runRedis conn ping
***Exception: connect: does not exist (No route to host)
You can automate the above code snippets into Haskell code with a main function as demonstrated below:
{-# LANGUAGE OverloadedStrings #-}importDatabase.Redismain ::IO (EitherReplyStatus)
main =do
conn <- connect defaultConnectInfo
runRedis conn ping
The OverloadedStrings extension allows string literals to be polymorphic for the IsString class. You can compile and run the above code inside GHCi, as follows:
$ ghci ping.hs
GHCi, version 7.6.3: http://www.haskell.org/ghc/:? for help
Loading package ghc-prim ... linking ... done.Loading package integer-gmp ... linking ... done.Loading package base ... linking ... done.
[1of1] CompilingMain ( ping.hs, interpreted )
Ok, modules loaded:Main.
ghci> main
...RightPong
The echo Redis command is used to print a message that is passed as an argument to it. The equivalent hedis echo command expects the message to be of type ByteString. For example:
The type signature of the set function is shown below:
ghci>:t set
set
::RedisCtx m f =>Data.ByteString.Internal.ByteString->Data.ByteString.Internal.ByteString-> m (f Status)
You can verify the value of the key `a’ from the redis-cli command, and it must return the value “apple”:
127.0.0.1:6379> get a
"apple"
You can also retrieve the value of a key using the get function. For example:
{-# LANGUAGE OverloadedStrings #-}
import Database.Redis
import Control.Monad.IO.Class

main :: IO ()
main = do
  conn <- connect defaultConnectInfo
  runRedis conn $ do
         result <- get "a"
         liftIO $ print result
Executing the above code in GHCi gives the expected result:
ghci>:l get.hs
[1of1] CompilingMain ( get.hs, interpreted )
Ok, modules loaded:Main.
ghci> main
Right (Just"apple")
The liftIO function transforms an IO action into a Monad. Its type signature is shown below:
ghci>:t liftIO
liftIO ::MonadIO m =>IO a -> m a
The type signature of the get function is as follows:
ghci>:t get
get
::RedisCtx m f =>Data.ByteString.Internal.ByteString-> m (f (MaybeData.ByteString.Internal.ByteString))
We shall now explore accessing a PostgreSQL database using the postgresql-simple (0.4.10.0) package. You will need to install and configure PostgreSQL for your GNU/Linux distribution. Please follow your distribution documentation to do so. On Fedora, for example, you can install the database server using the following command:
You can also change a record entry using the UPDATE statement as shown below:
execute conn "update social.users SET lname = 'Peyton Jones' where fname = 'Simon'" ()
The corresponding entry is updated as seen from the psql prompt:
test=# select * from social.users;
id| fname | lname
----+-------+--------------
1 | Edwin | Brady
3 | Ulf | Norell
2 | Simon | Peyton Jones
(3 rows)
It is recommended to catch exceptions when running database commands. Consider the following example, where the number of arguments passed does not match with the expected:
{-# LANGUAGE OverloadedStrings #-}importDatabase.PostgreSQL.SimpleimportControl.ExceptionimportGHC.Intmain ::IO ()
main =do
conn <- connect defaultConnectInfo
{ connectUser ="postgres"
, connectPassword ="postgres123"
, connectDatabase ="test"
}
result <- try (execute conn "insert into social.users (id, fname, lname) values (?, ?, ?)" ["4" ::String, "Laurel" ::String]) ::IO (EitherSomeExceptionInt64)
case result ofLeft ex ->putStrLn$"Caught exception: "++show ex
Right val ->putStrLn$"The answer was: "++show val
close conn
The error is observed when the main function is executed as shown below:
ghci> main
Caught exception:FormatError {fmtMessage ="3 '?' characters, but 2 parameters", fmtQuery ="insert into social.users (id, fname, lname) values (?, ?, ?)", fmtParams = ["4","Laurel"]}
You can also retrieve multiple records from the database and use the results using a map function. An example is illustrated below:
[Published in Open Source For You (OSFY) magazine, March 2015 edition.]
In this ninth article on Haskell, I shall cover access to Sqlite, and MySQL databases using Haskell modules. A number of packages are available from the https://hackage.haskell.org/packages/#cat:Database website, but, I will illustrate a few of them with examples.
You first need to install the cabal-install tool on Fedora, for example, using the following command:
$ sudo yum install cabal-install
You can then install HDBC.Sqlite3 using the following command:
$ cabal install HDBC-sqlite3
This installs the latest 2.3.3.0 version from https://hackage.haskell.org/package/HDBC-sqlite3. You can also install the Sqlite3 package on Fedora for testing, as follows:
$ sudo yum install sqlite
To initiate a connection to a database, you can test it out in the GHCi prompt using the connectSqlite3 function, as shown below:
If you already have an existing Sqlite3 database, you can give the full path to the database and connect to it, or else you can now create a table using the Sqlite CREATE TABLE syntax as shown below:
ghci> run conn "CREATE TABLE names (id INTEGER NOT NULL, fname VARCHAR(80), lname VARCHAR(80))" []
0
The type signature of run is as follows:
ghci>:t run
run
::IConnection conn => conn ->String-> [SqlValue] ->IOInteger
It takes three arguments as input and performs an IO computation that returns an integer indicating the status of the execution. The first argument to run is the connection, the second argument is the Sqlite command to be executed, and finally is the array of SqlValues that provide a mapping between Haskell values and SQL databases.
Both Haskell and SQL databases have types, and different databases may have different representations of the types. In order to provide a consistent mapping between the two, each HDBC driver implements the relation using SqlValue.
You can now insert a record into the database using the following command:
ghci> run conn "INSERT INTO names (id, fname, lname) VALUES(1, 'Edwin', 'Brady')" []
1

ghci> commit conn
It takes a connection and completes the pending IO actions. To read the result from Haskell you can use the quickQuery function from the GHCi prompt, as follows:
ghci> quickQuery conn "SELECT * from names" []
[[SqlByteString"1",SqlByteString"Edwin",SqlByteString"Brady"]]
The type signature of the quickQuery function is as follows:
It is considered good practice to use handleSqlError before running any HDBC commands to catch errors that may arise during the database transactions. For example:
ghci> handleSqlError $ quickQuery conn "SELECT * from namesaaa" []
***Exception: user error (SQLerror:SqlError {seState ="", seNativeError =1, seErrorMsg ="prepare 23: SELECT * from namesaaa: no such table: namesaaa"})
To disconnect from the database, you can use the disconnect function provided by HDBC as shown below:
ghci> disconnect conn
Let’s now look at how to access a MySQL database using the mysql-simple package. You will also need to create or grant privileges for an existing user to use the MySQL database server. Please follow your GNU/Linux distribution manual on how to install and configure a MySQL server. On Fedora, for example, you must have mysql and mysql-server installed:
You can install the mysql-simple Haskell package using:
$ cabal install mysql-simple
Create a test database using the mysql command line tool as shown below:
$ mysql -u user -p
Enter password:
Welcome to the MySQL monitor. Commands end with ; or \g.
Your MySQL connection id is 3
Server version: 5.5.38-log MySQL Community Server (GPL)
Copyright (c) 2000, 2014, Oracle and/or its affiliates. All rights reserved.
Oracle is a registered trademark of Oracle Corporation and/or its
affiliates. Other names may be trademarks of their respective
owners.
Type 'help;' or '\h'for help. Type '\c' to clear the current input statement.
mysql> create database test;
Query OK, 1 row affected (0.03 sec)
Let us create a users’ table that has an id as well as first name and last name fields, using the mysql-simple package, as follows:
{-# LANGUAGE OverloadedStrings #-}importDatabase.MySQL.Simplemain ::IO ()
main =do
conn <- connect defaultConnectInfo
{ connectUser ="user"
, connectPassword ="password"
, connectDatabase ="test"
}
execute conn "create table users (id INT, fname VARCHAR(80), lname VARCHAR(80))" ()
close conn
The OverloadedStrings extension allows string literals to be polymorphic for the IsString class. The defaultConnectInfo is of type ConnectInfo:
You can check with the mysql command line utility for the created table:
mysql> use test;
Reading table information for completion of table and column names
You can turn off this feature to get a quicker startup with -A
Database changed
mysql> desc users;
+-------+-------------+------+-----+---------+-------+
| Field | Type | Null | Key | Default | Extra |
+-------+-------------+------+-----+---------+-------+
|id| int(11)| YES || NULL ||| fname | varchar(80)| YES || NULL ||| lname | varchar(80)| YES || NULL ||
+-------+-------------+------+-----+---------+-------+
3 rows inset(0.00 sec)
You can now list the databases available in the MySQL server using the query_ function as illustrated below:
It is important to catch any exceptions that may arise on executing the database commands. Consider the following example, where the number of arguments passed does not match with the expected:
{-# LANGUAGE OverloadedStrings #-}importDatabase.MySQL.SimpleimportControl.ExceptionimportGHC.Intmain ::IO ()
main =do
conn <- connect defaultConnectInfo
{ connectUser ="user"
, connectPassword ="password"
, connectDatabase ="test"
}
result <- try (execute conn "insert into users (id, fname, lname) values (?, ?, ?)" ["4" ::String, "Laurel" ::String]) ::IO (EitherSomeExceptionInt64)
case result ofLeft ex ->putStrLn$"Caught exception: "++show ex
Right val ->putStrLn$"The answer was: "++show val
close conn
The error is caught when the main function is executed inside GHCi:
ghci> main
Caught exception:FormatError {fmtMessage ="3 '?' characters, but 2 parameters", fmtQuery ="insert into users (id, fname, lname) values (?, ?, ?)", fmtParams = ["4","Laurel"]}
You can also map through the results returned from the database and use them for your needs. The following is an illustration of the same:
The resultant output when executing the main function in GHCi is given below:
ghci> main
EdwinBradySimonPeytonJonesUlfNorell
You are encouraged to read Database.MySQL.Simple documentation from https://hackage.haskell.org/package/mysql-simple-0.2.2.4/docs/Database-MySQL-Simple.html for more information.
[Published in Open Source For You (OSFY) magazine, February 2015 edition.]
Let’s take a look at the property-based testing of Haskell programs and at the Cabal tool, which is used to build and manage Haskell packages and applications.
One of the main features of testing in Haskell is property-based testing. The type system allows you to infer and derive types, and also helps in auto-generating test cases. QuickCheck is a popular property-based testing library for Haskell. If your program is pure, you can write tests to ascertain the properties and invariants of your programs, and the tests can be auto-generated and executed.
You can install QuickCheck on Fedora, for example, by using the following command:
$ sudo yum install ghc-QuickCheck-devel
Consider a simple function to add two integers:
mySum ::Int->Int->Int
mySum a b = a + b
We can ascertain the property of the function that ‘a + b’ is the same as ‘b + a’ using the QuickCheck library. You must first define the invariant in a function as shown below:
prop_mySum a b = mySum a b == mySum b a
You can test the code directly in the GHCi prompt, using the following command:
You can also invoke the quickCheck function in a main function, as shown below:
importTest.QuickCheckmySum ::Int->Int->Int
mySum a b = a + b
prop_mySum ::Int->Int->Bool
prop_mySum a b = mySum a b == mySum b a
main ::IO ()
main = quickCheck prop_mySum
Compiling and executing the above code produces the following output:
$ ghc --make sum.hs
[1 of 1] Compiling Main             ( sum.hs, sum.o )
Linking sum ...

$ ./sum
+++ OK, passed 100 tests.
You can also dump the input that was generated for the various test cases using the verboseCheck function, as shown below:
main ::IO ()
main = verboseCheck prop_mySum
Executing the above code with the updated main function will yield 100 input test cases that were generated in runtime.
The head function in Haskell expects to receive a non-empty list. You can write a headExists function to check if the head exists for a list of integers, as shown below:
headExists :: [Int] ->Bool
headExists list
|null list =False|otherwise=True
You can load the above code in GHCi and test it out, as follows:
Let’s assume that, by mistake, you wrote an incorrect property-based test where the headExists function will always return ‘False’, ignoring the ‘otherwise’ case.
importTest.QuickCheckheadExists :: [Int] ->Bool
headExists list
|null list =False|otherwise=Trueprop_headExists :: [Int] ->Bool
prop_headExists emptyList = headExists emptyList ==Falsemain ::IO ()
main = quickCheck prop_headExists
Testing the code produces the following output:
$ ghc --make head.hs
[1 of 1] Compiling Main             ( head.hs, head.o )
Linking head ...

$ ./head
*** Failed! Falsifiable (after 3 tests):
[0]
The QuickCheck library generated test cases for different [Int] types and it returned a failure after the third test, for which the input was [0]. Clearly, the ‘headExists [0]’ computation will return ‘True’ and not ‘False’.
The way we defined the property is incorrect. We know that if the list is empty, then its length is zero. We can write a helper function lengthZero for the above, as follows:
lengthZero :: [Int] ->Bool
lengthZero list
|length list ==0=True|otherwise=False
We can then use this function to assert that for any Integer list, if headExists returns ‘False’ then the lengthZero function must return ‘True’. The complete code is shown below:
importData.ListimportTest.QuickCheckheadExists :: [Int] ->Bool
headExists list
|null list =False|otherwise=TruelengthZero :: [Int] ->Bool
lengthZero list
|length list ==0=True|otherwise=Falseprop_headExists :: [Int] ->Bool
prop_headExists list = headExists list ==not (lengthZero list)
main ::IO ()
main = quickCheck prop_headExists
Executing the code produces the required output:
$ ghc --make head.hs
[1 of 1] Compiling Main             ( head.hs, head.o )
Linking head ...

$ ./head
+++ OK, passed 100 tests.
We can also re-write the above code based on conditional properties. The property that the headExists function will return ‘True’ only for non-empty lists can be defined as a constraint. The notation syntax is condition ==> property. In our example, if the condition that the list is non-empty is ‘True’, then the property that the headExists function for the list must return is ‘True’. Also, when the list is empty, the headExists function must return ‘False’. These two conditions can be written as follows:
importData.ListimportTest.QuickCheckheadExists :: [Int] ->Bool
headExists list
|null list =False|otherwise=Trueprop_headExists :: [Int] ->Property
prop_headExists list =length list >0==> headExists list ==Trueprop_emptyList :: [Int] ->Property
prop_emptyList list =length list ==0==> headExists list ==Falsemain ::IO ()
main =do
quickCheck prop_headExists
quickCheck prop_emptyList
Testing the code produces the following output:
$ ghc --make cond.hs
[1 of 1] Compiling Main             ( cond.hs, cond.o )
Linking cond ...

 $ ./cond
+++ OK, passed 100 tests.
*** Gave up! Passed only 38 tests.
These tests can be integrated with Hspec or HUnit for a more verbose output.
Cabal
Cabal is a software tool that is used to describe a Haskell application, list its dependencies, and provide a manifestation to distribute the source and binaries. It is not to be confused with a distribution package manager like RPM or the Debian package management system. You can install Cabal using your distribution package manager. On Fedora, for example, you can use the following command:
$ sudo yum install cabal-install
Haskell software programs are available in hackage.haskell.org, and each project has a .cabal file. Let us take an example of the HSH-2.1.2 package at http://hackage.haskell.org/package/HSH which allows you to use shell commands and expressions within Haskell programs. You can download HSH-2.1.2.tar.gz and extract it using:
The .cabal file has various fields that describe the Haskell application. The contents of the HSH.cabal for version 2.1.2 are given below:
Name:HSHVersion:2.1.3License:LGPLMaintainer:JohnGoerzen<jgoerzen@complete.org>Author:JohnGoerzenStability:BetaCopyright:Copyright (c) 2006-2014JohnGoerzenCategory: system
license-file:COPYRIGHT
extra-source-files:COPYING
homepage: http://software.complete.org/hsh
Synopsis:Library to mix shell scripting with Haskell programs
Description:HSH is designed to let you mix and match shell expressions with
Haskell programs.WithHSH, it is possible to easily run shell
commands, capture their output or provide their input, and pipe them
to and from other shell commands and arbitrary Haskell functions at will.Category:SystemCabal-Version:>=1.2.3Build-type:Simple
flag buildtests
description:Build the executable to run unit tests
default:False
library
Exposed-Modules:HSH, HSH.Command, HSH.ShellEquivs, HSH.ChannelExtensions:ExistentialQuantification, OverlappingInstances,
UndecidableInstances, FlexibleContexts, CPPBuild-Depends: base >=4&&<5, mtl, process, regex-compat, MissingH>=1.0.0,
hslogger, filepath, regex-base, regex-posix, directory,
bytestring
if!os(windows)
Build-Depends: unix
GHC-Options:-O2-threaded -WallExecutable runtests
if flag(buildtests)
Buildable:TrueBuild-Depends: base >=4&&<5, mtl, process, regex-compat,
MissingH>=1.0.0,
hslogger, filepath, regex-base, regex-posix, directory,
bytestring, HUnit, testpack
if!os(windows)
Build-Depends: unix
elseBuildable:FalseMain-Is: runtests.hs
HS-Source-Dirs: testsrc, .Extensions:ExistentialQuantification, OverlappingInstances,
UndecidableInstances, FlexibleContexts, CPPGHC-Options:-O2-threaded
Enter the HSH-2.1.2 directory and configure the project using the cabal configure command as shown below:
$ cd HSH-2.1.2

$ cabal configure
Resolving dependencies...
Configuring HSH-2.1.2...
You can then compile the project sources using the cabal build step:
$ cabal build

Building HSH-2.1.2...
Preprocessing library HSH-2.1.2...
[1 of 4] Compiling HSH.Channel      ( HSH/Channel.hs, dist/build/HSH/Channel.o )
...
[2 of 4] Compiling HSH.Command      ( HSH/Command.hs, dist/build/HSH/Command.o )
...
[3 of 4] Compiling HSH.ShellEquivs  ( HSH/ShellEquivs.hs, dist/build/HSH/ShellEquivs.o )
...
[4 of 4] Compiling HSH              ( HSH.hs, dist/build/HSH.o )
In-place registering HSH-2.1.2...
You can install the built library files using the cabal install command. By default, it installs to ~/.cabal folder as shown below:
You can also generate HTML documentation for the source code using the cabal haddock option. The HTML files can also be made available at hackage.haskell.org.
$ cabal haddock

Running Haddock for HSH-2.1.2...
Preprocessing library HSH-2.1.2...
Warning: The documentation for the following packages are not installed. No
links will be generated to these packages: MissingH-1.3.0.1, rts-1.0,
hslogger-1.2.6, network-2.6.0.2
Haddock coverage:
...
Documentation created: dist/doc/html/HSH/index.html
If you make changes to the sources and wish to generate a new release, you can update the Version field in the HSH.cabal file.
Version:2.1.3
In order to make a new tarball, use the cabal sdist command:
$ cabal sdist

Distribution quality warnings:
...
Building source dist for HSH-2.1.3...
Preprocessing library HSH-2.1.3...
Source tarball created: dist/HSH-2.1.3.tar.gz
To test the installed application, you can run GHCi from a directory other than the HSH-2.1.2 sources directory. For example:
$ ghci
GHCi, version 7.6.3: http://www.haskell.org/ghc/:? for help
Loading package ghc-prim ... linking ... done.Loading package integer-gmp ... linking ... done.Loading package base ... linking ... done.
ghci>:m +HSH
ghci HSH> runIO "date"SunJan414:22:37IST2015
You should not run GHCi from the sources directory, since it will find the module in it and try to use it instead of the installed modules in ~/.cabal folder.
You can also test the installation by writing a program:
importHSH.Commandmain ::IO ()
main =do
runIO "date"
You can compile and execute the above as shown below:
$ ghc --make test.hs
[1 of 1] Compiling Main             ( test.hs, test.o )
Linking test ...

$ ./test
Sun Jan  4 14:25:19 IST 2015
You are encouraged to read the Cabal guide at https://www.haskell.org/cabal/ for information on specific fields and their options.
I attended PyCon India 2015 at NIMHANS Convention Centre, Bengaluru, India between October 2-4, 2015.
Day 1
I took an early train from Chennai to reach Bengaluru, and headed straight to the venue. The workshops were scheduled on the first day. After completing the registration formalities, I went to observe the DevSprint. I met a number of dgplug folks with whom I have been interacting online on #dgplug (irc.freenode.net).
Prof. Ronojoy then explained Bayesian networks, and how the probabilities can be fed to compute the probability for a causal-effect relationship. He demonstrated numerous examples with live coding. His work is part of the Value from Data initiative. Prof. Ronojoy and Dorai’s “Bayesian Inference and Data Analytics” video lectures are available in YouTube.
Day 2
After collecting my speaker kit, I attended the “KG award” presentation, which was given to Vijay Kumar, followed by the key note by Dr. Ajit Kumar. Vijay Kumar is doing an excellent job in organizing the monthly Chennaipy meet-ups. It was also good to meet Dr. Ajit Kumar after many years, having known his work and involvement with the Phoenix project.
During the tea break, I took the time to test my laptop with the projector in auditorium-1, where I was scheduled to speak. I had few demos in my talk, and I needed to set everything up before the talk. After the tea break, I attended the session by Pratap Vardhan on “Consuming Government Data with Python and D3”. The insights from the data and the analysis by Gramener were quite interesting.
I then moved to the “dgplug” 1130 IST staircase meeting, where I met more #dgplug students, and was able to connect IRC nicknames to people’s faces. My suggestion to the students was to start to identify their interests, and to specialize on them. Around noon, I moved back to auditorium-1 to setup everything that I needed for my talk - “Pretty Printing in Python”. There is one slot which I never wanted - the one before lunch because I know that I will be the one standing between the audience and their lunch, and that is exactly what I got. Nevertheless, the slot had to be taken by someone, and I was prepared for it. I had requested the organizers for a whiteboard and markers for my talk, and they had arranged for the same. I had lot of material to cover in 45 minutes. I did rush through, but, paused at times to explain the concepts. The audience were quite interested in 3D printing, and they asked some really interesting questions at the end of the talk. The video is available in YouTube:
After a quick lunch, I headed for the lightning talks to present “Nursery Rhymes”. We are all familiar with nursery rhymes, and the idea is to teach programming languages and software development using them. The audience needed something to wake them after a heavy lunch, and they thoroughly enjoyed the singing! The video link is provided below:
In the evening, I participated in the discussion on building and running communities organized by Satyaakam Goswami on how Python communities are organizing themselves in India, and the challenges faced by them. I shared my experience with the Chennaipy meet-ups, and insights from my “i want 2 do project. tell me wat 2 do” presentation and book. A video recording of the discussion is available:
Day 3
Nicholas H. Tollervey began the day’s proceedings with his keynote. He shared his experience on Python and education. The Micro Python and BBC micro:bit projects are interesting initiatives. The audience did have questions on why they cannot use Android or any other mobile phone for Python development. But, I think they missed the point that Open Hardware initiatives are important and the openness is not the same with present day mobile devices. Nicholas also covered important points on how to organize Python Dojo meet-ups, and as a teacher, the experiences he shared were very useful.
The previous night I prepared for another lightning talk titled “Yet Another Lightning Talk”, to once again, wake the audience after their heavy lunch. The talk went as I had planned, and the audience loved it! The video recording is available in YouTube:
A number of people approached me after the lightning talk, appreciating the creativity, and I did make a lot of new friends. The last talk of the day that I attended was on “Python load balancer; 0 to 1 million requests per second”, and yet again it turned out to be a a very generic talk, without going into specifics. I left early to catch a flight.
It will be helpful if organizers can identify talks where the speaker has contributed to the project. When you hire people for free and open source software (F/OSS) work, you would like to see what their contribution to the project is, and how they have added value to the project. I am interested to hear on what the speaker has done. I can always read the project web site, and find out more information about the project. I wish all conferences add this criteria in their talk selection process.
The workshops have been useful. The content of the talks need to be improved though. I was able to meet fellow F/OSS developers during the conference, and also made new friends. I am pleased that I was able to deliver a talk, and two lightning talks.
I would like to thank Manufacturing System Insights for sponsoring my travel, and allowing me to 3D print during office hours!
The first talk was titled “Paho Python client for MQTT” presented on Saturday, August 22, 2015. The slides and notes for the presentation are given below:
$ sudo apt-add-repository ppa:mosquitto-dev/mosquitto-ppa

  You are about to add the following PPA to your system:

  More info: https://launchpad.net/~mosquitto-dev/+archive/ubuntu/mosquitto-ppa
  Press [ENTER] to continue or ctrl-c to cancel adding it

  gpg: keyring `/tmp/tmpd67wf6/secring.gpg' created
  gpg: keyring `/tmp/tmpd67wf6/pubring.gpg' created
  gpg: requesting key 262C4500 from hkp server keyserver.ubuntu.com
  gpg: /tmp/tmpd67wf6/trustdb.gpg: trustdb created
  gpg: key 262C4500: public key "Launchpad mosquitto" imported
  gpg: Total number processed: 1
  gpg:               imported: 1  (RSA: 1)
  OK

$ apt-get update
$ apt-get install python-pip mosquitto mosquitto-clients
$ pip install paho-mqtt
Connectivity
Start mosquitto server
$ sudo /etc/init.d/mosquitto status
mosquitto stop/waiting

$ sudo /etc/init.d/mosquitto start
mosquitto start/running, process 11346
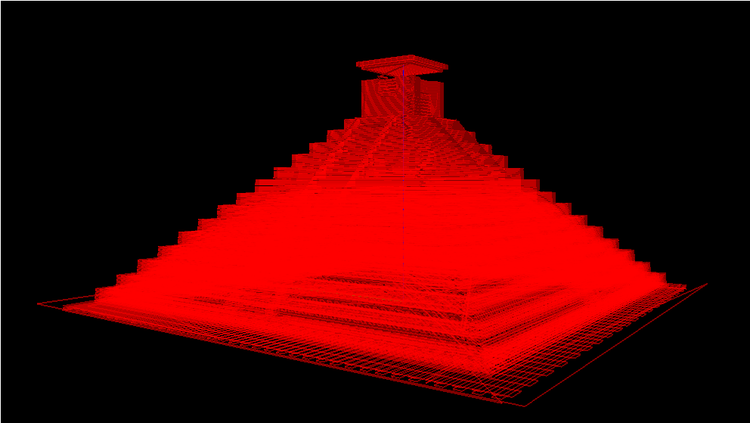
The September 2015 talk was scheduled on Saturday, September 26, 2015 and I gave a talk on “G-code Visualization Tools”. The talk began with an introduction and history of G-codes. A Maya pyramid STL file was then used with Pronterface to generate the following G-codes:
G90         ; Set to Absolute Positioning
G21         ; Set Units to Millimeters
M103        ; Turn off extruder
M105        ; Get extruder temperature
M106        ; Fan (cooling) on
M140 S60.0  ; Set Bed temperature
M141 S30.0  ; Set Chamber temperature
M142 S0.0   ; Holding pressure
M113 S1.0   ; Set Extruder PWM
M108 S210.0 ; Set Extruder Speed
M104 S200.0 ; Set Extruder Temperature
G1 X-54.72 Y-53.352 Z0.72 F60.0 ; G1 Move, F Feedrate, mm/rev
M101        ; Turn extruder 1 on
G1 X-54.72 Y53.352 Z0.72 F240.0
G1 X-51.84 Y53.352 Z0.72 F240.0
...
I then gave a demo of “Yet Another GCode Viewer” written by Jonathan Winterflood that uses the Pyglet library to render the G-code paths. You can also zoom, rotate and scale the image after it has loaded the input data. The brim that is printed for 3D objects is clearly visible in the rendition. A screenshot is shown below:
Blender is a free and open source software for computer graphics, 3D modelling and animations. It is written in C, C++ and Python. A Blender gcode reader plugin written by Simon Kirkby exists to visualize G-codes. This plugin generates the image from the G-codes, and converts the change in paths into arcs for a smoother image. The advantage of this plugin is that you can use all the goodies from Blender and Python. A screenshot of the pyramid using the Blender plugin is shown below:
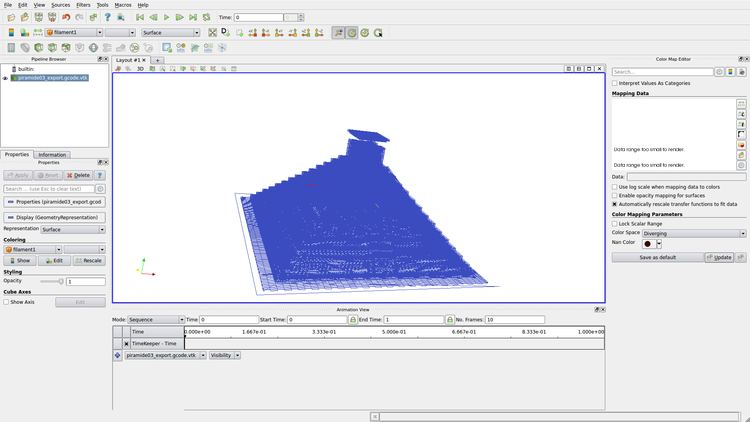
The Visualization Toolkit (VTK) is yet another free and open source software for image processing and visualization. It requires its input file in a VTK file format. After using the gcode2vtk utility to convert the Maya pyramid G-code file to a VTK file format, I was able to demonstrate the G-code path simulation using ParaView - a data analysis and visualization application. An illustration of the Maya pyramid in ParaView is shown below:
ParaView is written in C, C++, Fortran and Python. Both Blender and ParaView allow you to run simulations on the G-codes.
All the visualization tools discussed are free and open source software, and you can install them on your favourite *nix system.
[Published in Open Source For You (OSFY) magazine, January 2015 edition.]
In this article we shall cover testing of Haskell programs.
HUnit is a unit testing framework available for Haskell. It is similar to JUnit, which is used for the Java programming language. You can install HUnit on Fedora using the following command:
The TestCase is a constructor defined in the Test data type. The definition is as follows:
-- Test Definition-- ===============-- | The basic structure used to create an annotated tree of test cases.dataTest-- | A single, independent test case composed.=TestCaseAssertion-- | A set of @Test@s sharing the same level in the hierarchy. |TestList [Test]
-- | A name or description for a subtree of the @Test@s.|TestLabelStringTest
On executing the above code with GHCi, you get the following output:
The ‘~=?’ operation is shorthand to assert equality. Its definition is as follows:
-- | Shorthand for a test case that asserts equality (with the expected -- value on the left-hand side, and the actual value on the right-hand-- side).(~=?) :: (Eq a, Show a) => a -- ^ The expected value -> a -- ^ The actual value->Test
The ‘~:’ operation is shorthand to attach a label to a test. Its definition is shown below:
(~:) :: (Testable t) =>String-> t ->Test
label ~: t =TestLabel label (test t)
By compiling and executing the above code with GHCi, you get the following result:
On compiling the above code, you get the following output:
ghci>:l error.hs
[1of1] CompilingMain ( error.hs, interpreted )
error.hs:5:48:Couldn't match expected type`[Char]' with actual type `[a1] -> [b0]'In the returntypeof a call of`map' Probable cause: `map' is applied to too few arguments
In the second argument of`(~=?)', namely `(map"earth")'In the second argument of`(~:)', namely `"EARTH"~=? (map"earth")'error.hs:5:52:Couldn't match expected type`a1 -> b0' with actual type `[Char]'In the first argument of`map', namely `"earth"'In the second argument of`(~=?)', namely `(map"earth")'In the second argument of`(~:)', namely `"EARTH"~=? (map"earth")'Failed, modules loaded: none.
The correct version of the code and its output are shown below:
Other than the assertEqual function, there are conditional assertion functions like assertBool, assertString and assertFailure that you can use. The assertBool function takes a string that is displayed if the assertion fails and a condition to assert. A couple of examples are shown below:
importTest.HUnit
test1 =TestCase$ assertBool "Does not happen"True
Executing the above code in GHCi, gives you the following output:
assertFailure and assertString functions take a string as input, and return an Assertion. These are used as part of other test functions. The assertFailure function is used in the definition of the assertBool function as shown below:
-- | Asserts that the specified condition holds.assertBool ::String-- ^ The message that is displayed if the assertion fails->Bool-- ^ The condition->Assertion
assertBool msg b = unless b (assertFailure msg)
You can also use assertString for handling a specific case. For example:
The keywords describe and it are used to specify the tests. The context keyword can also be used as an alias for describe. A particular test can be marked ‘pending’ using the pending and pendingWith keywords. The pendingWith function takes a string message as an argument, as illustrated below:
importTest.Hspec
main = hspec $do
describe "Testing equality"$do
it "returns 3 for the sum of 2 and 1"$do3`shouldBe` (2+1)
describe "Testing subtraction"$do
it "returns 3 when subtracting 1 from 4"$do
pendingWith "need to add test"
The corresponding output for the above code snippet is provided below:
ghci> main
Testing equality
returns 3 for the sumof2and1Testing subtraction
returns 3 when subtracting 1 from 4#PENDING: need to add test
Finishedin0.0006 seconds
2 examples, 0 failures, 1 pending
You can use the after and before keywords to specify setup and tear down functions before running a test. For example:
importTest.HspecgetInt ::IOInt
getInt =doputStrLn"Enter number:"
number <-readLnreturn number
afterPrint ::ActionWithInt
afterPrint 3=print3
main = hspec $ before getInt $ after afterPrint $do
describe "should be 3"$do
it "should successfully return 3"$ \n ->do
n `shouldBe`3
Executing the above code yields the following output:
ghci> main

should be 3
Enter number:
3
3
  should successfully return 3

Finished in 0.6330 seconds
1 example, 0 failures
The different options used with Hspec can be listed with the –help option, as follows:
$ runhaskell file.hs --help
Usage: spec.hs [OPTION]...
OPTIONS
--help display this help and exit
-m PATTERN --match=PATTERN only run examples that match given PATTERN
--color colorize the output
--no-color do not colorize the output
-f FORMATTER --format=FORMATTER use a custom formatter; this can be one of:
specdoc
progress
failed-examples
silent
-o FILE --out=FILE write output to a file instead of STDOUT
--depth=N maximum depth of generated test values for
SmallCheck properties
-a N --qc-max-success=N maximum number of successful tests before a
QuickCheck property succeeds
--qc-max-size=N size to use for the biggest test cases
--qc-max-discard=N maximum number of discarded tests per
successful test before giving up
--seed=N used seed for QuickCheck properties
--print-cpu-time include used CPU timein summary
--dry-run pretend that everything passed; don't verify anything --fail-fast abort on first failure -r --rerun rerun all examples that failed in the previously test run (only works in GHCi)
Other than the shouldBe expectation, you can also use assertions like shouldReturn, shouldSatisfy, and shouldThrow. Examples of each are given below:
importTest.HspecimportControl.Exception (evaluate)
main = hspec $do
describe "shouldReturn"$do
it "should successfully return 3"$doreturn3`shouldReturn`3
describe "shouldSatisfy"$do
it "should satisfy the condition that 10 is greater than 5"$do10`shouldSatisfy` (>5)
describe "shouldThrow"$do
it "should throw an exception when taking head of an empty list"$do
evaluate (1`div`0) `shouldThrow` anyException
Executing the above code provides the following output:
ghci> main
shouldReturn
should successfully return an Integer
shouldSatisfy
should satisfy the condition that 10 is greater than 5
shouldThrow
should throw an exception when taking headof an empty list
Finishedin0.0015 seconds
3 examples, 0 failures
The evaluate function can be used to check for exceptions. Its type signature is as follows:
ghci>:t evaluate
evaluate :: a ->IO a
You can also re-use HUnit tests and integrate them with Hspec. An example is shown below:
importTest.HUnitimportTest.HspecimportTest.Hspec.Contrib.HUnit (fromHUnitTest)
test1 =TestList [ TestLabel"Test subtraction" foo ]
foo ::Test
foo =TestCase$do3@?= (4-1)
main = hspec $do
describe "Testing equality"$do
it "returns 3 for the sum of 2 and 1"$do3`shouldBe` (2+1)
describe "Testing subtraction"$do
fromHUnitTest test1
Testing the code in GHCi produces the following output:
ghci> main
Loading package hspec-contrib-0.2.0... linking ... done.Testing equality
returns 3 for the sumof2and1Testing subtraction
Test subtraction
Finishedin0.0004 seconds
2 examples, 0 failures
The Hspec tests can also be executed in parallel. For example, computing the Fibonacci for a set of numbers, and asserting their expected values can be run in parallel as shown below:
importTest.Hspecfib ::Int->Int
fib 0=0
fib 1=1
fib n = fib (n-1) + fib (n-2)
main = hspec $ parallel $do
describe "Testing Fibonacci"$do
it "must return 6765 for fib 20"$do
fib 20`shouldBe`6765
it "must return 75025 for fib 25"$do
fib 25`shouldBe`75025
it "must return 832040 for fib 30"$do
fib 30`shouldBe`832040
it "must return 9227465 for fib 35"$do
fib 35`shouldBe`9227465
You can compile and execute the above code as shown below:
$ ghc -threaded parallel.hs
Linking parallel ...

$ ./parallel +RTS -N -RTS

Testing Fibonacci
  must return 6765 for fib 20
  must return 75025 for fib 25
  must return 832040 for fib 30
  must return 9227465 for fib 35

Finished in 0.9338 seconds
4 examples, 0 failures
[Published in Open Source For You (OSFY) magazine, December 2014 edition.]
This article is a must read for anyone interested in getting a good insight into the input/output (IO) functionality of Haskell.
Input/output (IO) can cause side-effects and hence is implemented as a Monad. The IO Monad takes some input, does some computation and returns a value. The IO action is performed inside a main function. Consider a simple ‘Hello world’ example:
main = putStrLn "Hello, World!"
Executing the above code in GHCi produces the following output:
$ ghci hello.hs
GHCi, version 7.6.3: http://www.haskell.org/ghc/  :? for help
Loading package ghc-prim ... linking ... done.
Loading package integer-gmp ... linking ... done.
Loading package base ... linking ... done.
[1 of 1] Compiling Main             ( foo.hs, interpreted )
Ok, modules loaded: Main.

ghci> main
Hello, World!
The type signatures of main and putStrLn are:
main ::IO ()
putStrLn ::String->IO ()
putStrLn takes a String as input and prints the String to output. It doesn’t return anything, and hence the return type is the empty tuple ().
The getLine function performs an IO to return a String.
ghci>:t getLinegetLine ::IOString
ghci> name <-getLineFoo
ghci> name
"Foo"
The ‘<-’ extracts the result of the IO String action, unwraps it to obtain the String value, and ‘name’ gets the value. So, the type of ‘name’ is:
ghci>:t name
name ::String
The do syntax is useful to chain IO together. For example:
main =doputStrLn"Enter your name:"
name <-getLineputStrLn ("Hello "++ name)
Executing the code in GHCi gives the following results:
ghci> main
Enter your name:ShakthiHelloShakthi
The putStr function is similar to the putStrLn function, except that it doesn’t emit the newline after printing the output string. Its type signature and an example are shown below:
The putChar function takes a single character as input, and prints the same to the output. For example:
ghc>:t putCharputChar ::Char->IO ()
ghci>putChar's'
s
The getChar function is similar to the getLine function except that it takes a Char as input. Its type signature and usage are illustrated below:
ghci>:t getChargetChar ::IOChar
ghci> a <-getChar
d
ghci> a
'd'
ghci>:t a
a ::Char
The print function type signature is as follows:
ghci>:t printprint ::Show a => a ->IO ()
It is a parameterized function which can take input of any type that is an instance of the Show type class, and prints that to the output. Some examples are given below:
The getContents function reads the input until the end-of-file (EOF) and returns a String. Its type signature is shown below:
ghci>:t getContentsgetContents ::IOString
An example code is demonstrated below. It only outputs lines whose length is less than five characters:
main =doputStrLn"Enter text:"
text <-getContentsputStr.unlines.filter (\line ->length line <5) $lines text
Testing the above example gives the following output:
ghci> main
Enter text:
a
a

it
it

the
the

four
four

empty

twelve

haskell

o
o
You can break out of this execution by pressing Ctrl-c at the GHCi prompt.
The openFile, hGetContents, hClose functions can be used to obtain a handle for a file, to retrieve the file contents, and to close the handle respectively. This is similar to file handling in C. Their type signatures are shown below:
The different IOModes are ReadMode, WriteMode, AppendMode and ReadWriteMode. It is defined as follows:
-- | See 'System.IO.openFile'dataIOMode=ReadMode|WriteMode|AppendMode|ReadWriteModederiving (Eq, Ord, Ix, Enum, Read, Show)
An example code is illustrated below:
importSystem.IO
main =do
f <- openFile "/etc/resolv.conf"ReadMode
text <- hGetContents f
putStr text
hClose f
Executing the code in GHCi produces the following output:
ghci> main
#Generated by NetworkManager
nameserver 192.168.1.1
A temporary file can be created using the openTempFile function. It takes as input a directory location, and a pattern String for the filename. Its type signature is as follows:
importSystem.IOimportSystem.Directory(removeFile)
main =do
(f, handle) <- openTempFile "/tmp""abc"putStrLn f
removeFile f
hClose handle
You must ensure to remove the file after using it. An example is given below:
ghci> main
/tmp/abc2731
The operations on opening a file to get a handle, getting the contents, and closing the handle can be abstracted to a higher level. The readFile and writeFile functions can be used for this purpose. Their type signatures are as follows:
main =doappendFile"/tmp/log.txt""1"appendFile"/tmp/log.txt""2"appendFile"/tmp/log.txt""3"
The contents of /tmp/log.txt is ‘123’.
The actual definitions of readFile, writeFile and appendFile are in the System.IO module in the Haskell base package:
readFile ::FilePath->IOStringreadFile name = openFile name ReadMode>>= hGetContents
writeFile ::FilePath->String->IO ()
writeFile f txt = withFile f WriteMode (\ hdl -> hPutStr hdl txt)
appendFile ::FilePath->String->IO ()
appendFile f txt = withFile f AppendMode (\ hdl -> hPutStr hdl txt)
The System.Environment module has useful functions to read command line arguments. The getArgs function returns an array of arguments passed to the program. The getProgName provides the name of the program being executed. Their type signatures are shown below:
You can use the createDirectoryIfMissing function, and pass a Boolean option to indicate whether to create the directory or not. Its type signature is as follows:
If True is passed and the directory does not exist, the function will create parent directories as well. If the option is False, it will throw up an error.
ghci> createDirectoryIfMissing False"/tmp/a/b/c"***Exception:/tmp/a/b/c: createDirectory: does not exist (No such file or directory)
ghci> createDirectoryIfMissing True"/tmp/a/b/c"
ghci>
You can remove directories using the removeDirectory or removeDirectoryRecursive functions. Their type signatures are as follows:
The existence of a file can be tested with the doesFileExist function. You can check if a directory is present using the doesDirectoryExist function. Their type signatures are:
To know the current directory from where you are running the command, you can use the getCurrentDirectory function, and to know the contents in a directory you can use the getDirectoryContents function. Their type signatures are:
[Published in Open Source For You (OSFY) magazine, November 2014 edition.]
In this article, we shall explore more type classes in Haskell. Consider the Functor type class:
classFunctor f where fmap :: (a -> b) -> f a -> f b
It defines a function fmap, that accepts a function as an argument that takes input of type a and returns type b, and applies the function on every type ‘a’ to produce types ‘b’. The f is a type constructor. An array is an instance of the Functor class and is defined as shown below:
instanceFunctor [] wherefmap=map
The Functor type class is used for types that can be mapped over. Examples of using the Functor type class for arrays are shown below:
An instance of a Functor class must satisfy two laws. Firstly, it must satisfy the identity property where running the map over an id must return the id:
Second, if we compose two functions and ‘fmap’ over it, then it must be the same as mapping the first function with the Functor, and then applying the second function as shown below:
fmap (f . g) =fmap f .fmap g
This can also be written for a Functor ‘F’ as follows:
The Applicative Functor unwraps the values before performing an operation.
For a data type to be an instance of the Monoid type class, it must satisfy two properties:
Identity value
Associative binary operator
a * (b * c) = (a * b) * c
These are defined in the Monoid type class:
classMonoid a where mempty :: a -- identity mappend :: a -> a -> a -- associative binary operation
Lists can be a Monoid. The identity operator is [] and the associative binary operator is (++). The instance definition of lists for a Monoid is given below:
instanceMonoid [a] where
mempty = []
mappend = (++)
The Monad type class takes a wrapped value and a function that does some computation after unwrapping the value, and returns a wrapped result. The Monad is a container type and hence a value is wrapped in it. The bind operation (>>=) is the important function in the Monad class that performs this operation. The ‘return’ function converts the result into a wrapped value. Monads are used for impure code where there can be side effects, for example, during a system call, performing IO etc. A data type that implements the Monad class must obey the Monad Laws. The definition of the Monad class is as follows:
classMonad m where (>>=) :: m a -> (a -> m b) -> m b
(>>) :: m a -> m b -> m b
return :: a -> m a
fail ::String-> m a
The Maybe type is an instance of a Monad and is defined as:
instanceMonadMaybewherereturn x =Just x
Nothing>>= f =NothingJust x >>= f = f x
fail _ =Nothing
So, when ’m’ is Maybe, and ‘a’ and ‘b’ are of type Int, the bind operation becomes:
The newtype keyword is used in Haskell to define a new data type that has only one constructor and only one field inside it. The Writer data type can be defined using the record syntax as:
newtypeWriter w a =Writer { runWriter :: (a, w) }
It can be an instance of a Monad as follows:
importData.MonoidnewtypeWriter w a =Writer { runWriter :: (a, w) }
instance (Monoid w) =>Monad (Writer w) wherereturn x =Writer (x, mempty)
(Writer (x,v)) >>= f =let (Writer (y, v')) = f x inWriter (y, v `mappend` v')
To test the definition, you can write a double function as shown below:
The arguments to runWriter are matched to the bind function definition in the Writer Monad. Thus, x == 6, v == ‘doubled 3’, and f == ‘double’. The function application of ‘f x’ is ‘double 6’ which yields ‘(12, “doubled 6”)’. Thus y is 12 and v’ is ‘doubled 6’. The result is wrapped into a Writer Monad with y as 12, and the string v concatenated with v’ to give ‘doubled 3 doubled 6’. This example is useful as a logger where you want a result and log messages appended together. As you can see the output differs with input, and hence this is impure code that has side effects.
When you have data types, classes and instance definitions, you can organize them into a module that others can reuse. To enclose the definitions inside a module, prepend them with the ‘module’ keyword. The module name must begin with a capital letter followed by a list of types and functions that are exported by the module. For example:
You can import a module in your code or at the GHCi prompt, using the following command:
importControl.Monad.Writer
If you want to use only selected functions, you can selectively import them using:
importControl.Monad.Writer(listens)
If you want to import everything except a particular function, you can hide it while importing, as follows:
importControl.Monad.Writerhiding (censor)
If two modules have the same function names, you can explicitly use the fully qualified name, as shown below:
importqualifiedControl.Monad.Writer
You can then explicitly use the ‘listens’ functions in the module using Control.Monad.Writer.listens. You can also create an alias using the ‘as’ keyword:
importqualifiedControl.Monad.WriterasW
You can then invoke the ‘listens’ function using W.listens.
Let us take an example of the iso8601-time 0.1.2 Haskell package. The module definition is given below:
This is followed by the definition of functions. Some of them are shown below:
-- | Formats a time in ISO 8601, with up to 12 second decimals.---- This is the `formatTime` format @%FT%T%Q@ == @%%Y-%m-%dT%%H:%M:%S%Q@.formatISO8601 ::UTCTime->String
formatISO8601 t = formatTime defaultTimeLocale "%FT%T%QZ" t
-- | Pads an ISO 8601 date with trailing zeros, but lacking the trailing Z.---- This is needed because `formatTime` with "%Q" does not create trailing zeros.formatPadded ::UTCTime->String
formatPadded t
|length str ==19= str ++".000000000000"|otherwise= str ++"000000000000"where
str = formatTime defaultTimeLocale "%FT%T%Q" t
-- | Formats a time in ISO 8601 with up to millisecond precision and trailing zeros.-- The format is precisely:---- >YYYY-MM-DDTHH:mm:ss.sssZformatISO8601Millis ::UTCTime->String
formatISO8601Millis t =take23 (formatPadded t) ++"Z"...
The availability of free and open source software allows you to learn a lot from reading the source code, and it is a very essential practice if you want to improve your programming skills.
This year, 2015, marks a decade of completion of my website shakthimaan.com! Thanks to the grace of God, the Almighty. Thanks also to my parents, friends and well-wishers for their wonderful support and encouragement over the years.
I am also happy to announce the launch of the international hard cover edition of my book, “i want 2 do project. tell me wat 2 do”, for worldwide distribution. You can order the book at: